First, here's a picture of Lucca's concept art so you can see what I'm working off of:

To make Lucca's orange tunic, you'll need is 1-2 yards of orange fabric and some orange thread (plus normal sewing supplies, like pins, sewing machine, etc.). Some paper to make a pattern will help too. To determine exactly how much fabric you need, it will depend on a couple factors: first, if the fabric is 60 inches wide or only 45 (hopefully it's 60), and second, how wide around you need it to be. I am pretty sure 1 yard was more than enough for me, but I bought it a year ago so I can't really remember.
From there, it is pretty basic: you want to double up your fabric and trace out two pieces. One piece needs to be with the long edge along the fold (so that it's one big piece after you cut it out, for the back) and the other can be anywhere (for the two front panels). It will probably be easiest if you get some parchment paper or butcher paper (or something like that) and cut out the shape you want for the front panels first.
 |
| Front of Lucca's orange tunic |
 |
| Back of Lucca's orange tunic |
Make it a little longer than you think it might need to be so that you can play around with the length. It's easier to hem it shorter than to add more fabric! If you look closely, you can see I have about a 2 inch hem on mine.
Here's a very basic template to work off of if you need a more visual representation:

Once you have your pieces cut out, you'll want to pin the sides and top and try it on for size. See how big you want the arm holes, make sure it looks okay, etc. Then after you know where the arm holes will start, go ahead and sew up the side seams and top seams (along the top of the shoulders). Next you will want to hem the front edges (where it is diagonal on the front piece, the part that crosses over onto the other front piece) and the neckline along the back. Since it's curved, the easiest way to do this is to cut little notches in the fabric as needed to ease the curve so it doesn't scrunch all up, like so:
 |
| one zoomed in look at the neckline - see the notches along the curve? |
Now hem the sleeves. (That's the trickiest bit.)
 |
| Sleeve after being hemmed - shoulder part is to the right, armpit part is to the left. |
The sleeves probably won't need notches to ease the fabric since they aren't very curved.
Lastly, try it on again and then pin it to the length you want before hemming the bottom.
 |
| Corner of the hem |
As you can see here, if you get near the end and have extra fabric that is going to stick out funny over the edge, just tuck it under so you don't have to deal with it.
And there you have it! One Lucca tunic!

As an added bonus, you can use the leftover scraps to make a neck kerchief for Chrono!
And seriously, don't stress over this too much. If you have enough details, nobody is going to be looking closely at the construction. I'm sure someone with more sewing experience than me could whip up something super amazing, but this does the job and doesn't take too long to finish!
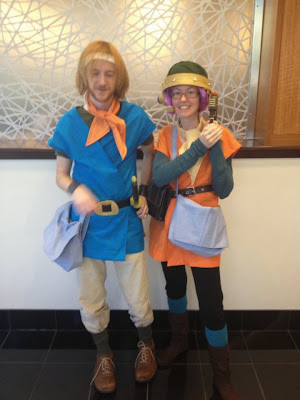
One last note; I used this same method to make Chrono's blue tunic as well. Here's a few close up pictures of that in case it is helpful.
One last note; I used this same method to make Chrono's blue tunic as well. Here's a few close up pictures of that in case it is helpful.
 |
| Front of Chrono tunic (please excuse the wrinkles) |
 |
| back of Chrono tunic |
Super helpful! I'm going as Lucca to PAX East this year and very excited to have found your blog. :]
ReplyDeleteI'm so glad it's useful for you! Please let me know if you have any questions!
Delete